How to Upload Photos From Mac to Shared Album
iCloud Photograph Sharing is a wonderfully private way to share digital memories with certain people. When you create or subscribe to a shared album, it appears on all of your devices. And since iCloud Photograph Sharing doesn't count confronting your allotted storage space for free iCloud accounts, information technology doesn't toll you a penny!
Turning on iCloud Photo Sharing
To start the sharing spree, turn on iCloud Photo Sharing on all your devices (this has nothing to practise with iCloud Photograph Library). In Photos for Mac, choose Photos > Preferences and in the iCloud pane, plough on iCloud Photo Sharing. On an iOS device, tap Settings and and then scroll down until y'all encounter Photos & Camera. Give it a tap and on the adjacent screen, tap the switch next to iCloud Photo Sharing (it turns greenish).
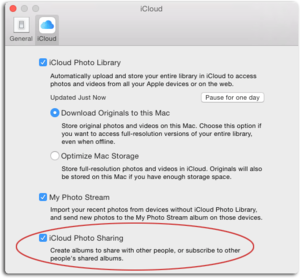
The iCloud pane of Photos' preferences holds the central to turning on various iCloud services.
Creating (and adding content to) shared albums is mercifully simple. In Photos for Mac, select an anthology or some thumbnails. Click the share icon in Photos'toolbar and choose iCloud Photograph Sharing. In the resulting canvas, click New Shared Album, and then on the side by side sheet, proper noun the album and invite someone to subscribe to it by entering their name, email accost, or cell phone number into the To field. In the Comment field, enter a description of the goodies you're most to share.
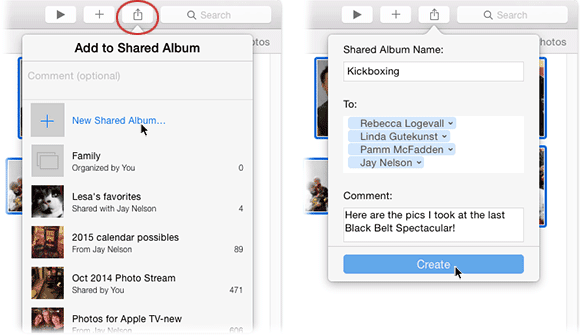
The sheet at left lets you create a new shared anthology or add selected items to a previously shared album. When creating a new shared album, you can employ the sheet at right to name information technology, invite people to information technology, etc.
When you're finished filling out the all the fields, click Create. Your invitees promptly receive an electronic mail invitation to subscribe to your album. In one case they click the Subscribe push in the email, the shared album appears in Photos'Shared view on all the devices on which they 've turned on iCloud Photograph Sharing. Creating a shared album in Photos for iOS works the same way, though y'all can't select a whole album for sharing: You have to select individual thumbnails instead (bummer!).
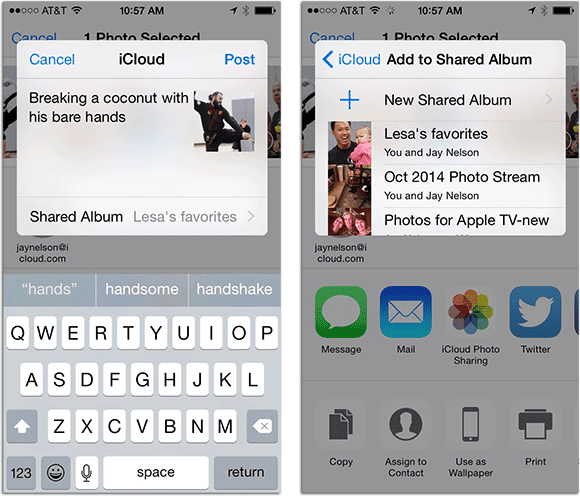
On the first sheet that appears (left), you tin enter a comment and so tap Shared Album at the bottom to summon the next sheet which shows a listing of shared albums (right).
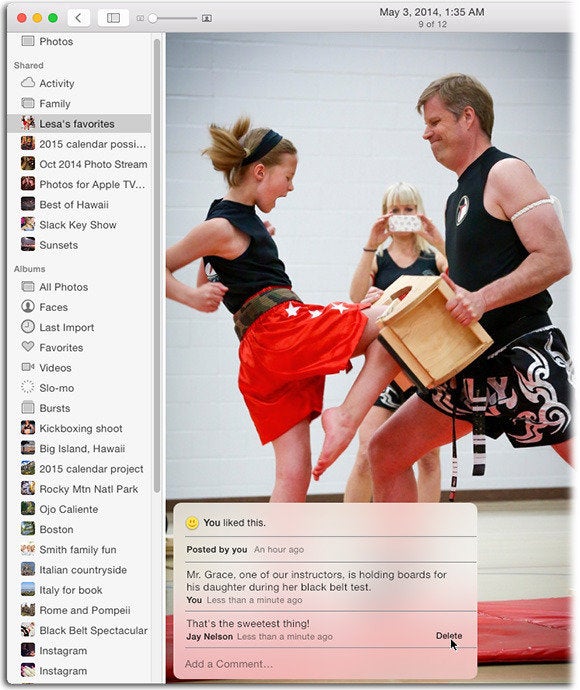
To like and annotate on an particular in a shared album in Photos for Mac, open up the album, double-click a picture or video and so click the "+" icon that appears in the picture's lower-left corner (it looks like a thought bubble). When you practice, the comment sail shown below appears. Click the smiley-face icon to like it, or click in the comment field and enter something pithy. Click Transport, and Photos adds your comment to the listing.
To delete a comment, point your cursor at information technology then click the Delete button that appears.
To like an image or add and view comments in Photos for iOS, tap to open the shared album, and then tap the picture itself to open information technology. Beneath the motion picture, yous see controls that let you like the epitome, view comments, and add your own. To delete a comment, tap and hold your finger down on it, and and so tap the Delete push button that appears simply higher up the comment.
Photos also helpfully collects all your sharing updates in a special Activitiesalbum in Shared view in both Photos for Mac and iOS. This album houses big, beautiful thumbnails of the most recent additions to each shared album, also as comments and likes—it's a swell fashion to breeze through shared content to see what everyone is up to.
Downloading content
In order to edit or use a shared photo in projects of your own, you need to download it. On your Mac, Control-click a thumbnail and choose Import from the shortcut menu. Photos dutifully adds the item to your Last Import album, where yous tin can treat it like any other motion picture or video in your library: Edit it, add it to another anthology, include it in a project, and and then on. To download content in Photos for iOS, tap the epitome thumbnail to open it, tap the share icon that appears, so tap Save Image from the row of icons that appears at the bottom of your device'south screen.
Letting subscribers add content
A bonus (and semi-hidden) feature of shared albums is that you can let any subscriber add their own pictures and videos to the anthology. This creates an incredibly convenient, two-way sharing betwixt you and your subscribers. To set it up in Photos for Mac, double-click a shared album to open it or, if you have the sidebar turned (Option + Command + S), only click the album'due south name in the Sharing department to select it. Adjacent, click the subscriber icon in Photos'toolbar (circled below). In the sheet that appears, plow on Subscribers Can Post.
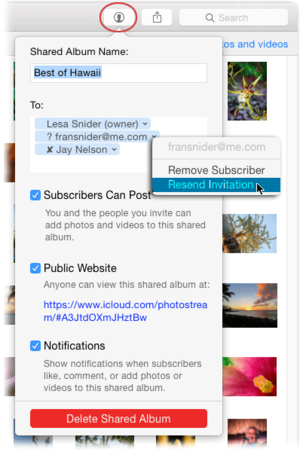
This sheet lets you perform all way of subscriber-related chores. A question marking to the left of a name ways that person hasn't responded. In that example, you can resend an invitation, as shown here. An X next to a name means that person unsubscribed from the album.
To do this in Photos for iOS, tap Shared at the bottom of your screen and, if necessary, tap the Back button at upper left to close the shared anthology yous're viewing so you meet thumbnails of all shared albums. Next, tap the album you desire to grant uploading permission to—you lot'll encounter the album'due south thumbnails (shown beneath at left). Tap People at the bottom right and in the side by side screen (shown beneath at right), tap the Subscribers Can Postal service switch to plough it on.
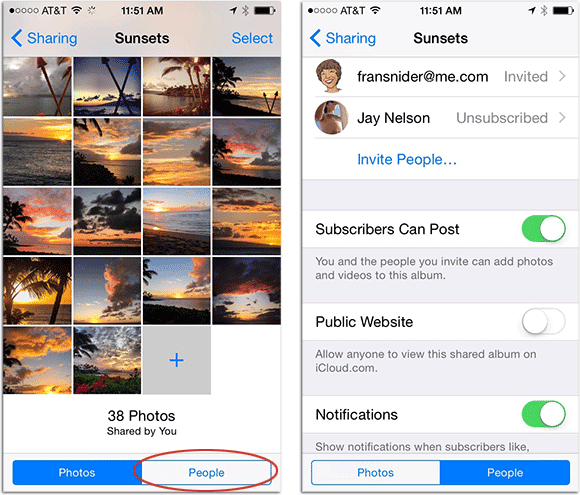
When you open up a shared album in Photos for iOS, the buttons at the bottom let y'all switch betwixt viewing thumbnails (Photos; left) and the people you invited to the album (People; right). When viewing People, you can manage subscribers and allow them to postal service content to the album.
From this betoken on, the shared anthology synchronizes everyone with access to it: Whatsoever items y'all, or a subscriber, add to the shared album is sent to every device of every person who subscribes to information technology. Likewise, whatever items you (or a subscriber) remove from the shared album disappear on all subscribed devices (you can only delete items y'all yourself add). Heck, PC users can bring together the iCloud Photo Sharing party by installing iCloud for Windows. (For info on how to download it and set it upwardly, visit Apple's support folio.)
Y'all can too create an emptyshared album that you, or others, can add content to later. This is handy when you desire to set a shared album for a far-flung friend or relative that they can put stuff into. To do it, but don't select any images before you create a new shared album. Be sure to requite the recipient(s) permission to add content the album and you're adept to become!
All in all, iCloud Photo Sharing is a heck of a lot of fun and the perfect way to share pictures with folks who aren't on Facebook or who aren't specially tech savvy. (You lot can too utilise it to create public websites, which is fodder for another column.) Until the next time, may the force be with yous all!
gillenwaterwenstoced.blogspot.com
Source: https://www.macworld.com/article/225715/how-to-create-shared-albums-in-photos-for-mac-and-ios.html
0 Response to "How to Upload Photos From Mac to Shared Album"
Post a Comment